

Productivity refers to the efficiency of converting inputs into outputs. It is a measure of how effectively resources like time, labor, and materials are utilized to achieve desired results. Enhancing productivity involves optimizing processes, reducing waste, and maximizing output, ultimately driving economic growth and improving overall performance.
To wrap text in Google Sheets, first select the cell or range of cells where you want the text to be wrapped. Then, navigate to the toolbar and click on the "Text wrapping" icon, which looks like a rectangle with an arrow. From the drop-down menu, choose "Wrap." This will ensure that any text that exceeds the cell width automatically moves to the next line, making it easier to read without altering the column size.
Hiding rows in Google Sheets is a straightforward process that helps streamline your view by concealing unnecessary data. To hide rows, simply select the rows you wish to hide by clicking and dragging over the row numbers on the left. Once selected, right-click on the highlighted area and choose the "Hide rows" option from the context menu. The hidden rows will be indicated by a gap in the row numbers, and you can easily unhide them later by clicking the arrows that appear.

To lock cells in Google Sheets, first, select the range of cells you want to protect. Then, navigate to the "Data" menu and choose "Protected sheets and ranges." In the sidebar that appears, you can specify who can edit the selected cells by adding users or restricting access to only yourself. After configuring the permissions, click “Done” to apply the protection. This ensures that the locked cells cannot be modified by others, maintaining the integrity of your data.
In Google Docs, you can easily format text as subscript or superscript to enhance your documents. To apply subscript, highlight the text you want to modify, then navigate to the "Format" menu, select "Text," and choose "Subscript." For superscript, follow the same steps but select "Superscript" instead. Alternatively, you can use keyboard shortcuts: Ctrl + , for subscript and Ctrl + . for superscript on Windows, and Command + , and Command + . on Mac. This allows for quick formatting adjustments.
To create a hanging indent in Google Docs, first highlight the text you want to format. Then, navigate to the ruler at the top of the document. Drag the bottom triangle, which represents the indent, to the right to your desired measurement. This will create the hanging indent effect, where the first line remains flush with the left margin while subsequent lines are indented. Alternatively, you can access the "Format" menu, select "Align & indent," and choose "Indentation options" to set the indent size.
To add a border in Google Docs, start by selecting the text or image you want to enclose. Navigate to the “Format” menu, then choose “Paragraph styles” followed by “Borders and shading.” In the dialog box, you can customize the border's color, width, and style. Adjust the settings as needed and apply them to create a visually appealing border around your content. This feature enhances the document's presentation and helps to highlight important sections effectively.
To change the background color in Google Docs, start by opening your document and navigating to the "File" menu. Select "Page setup" from the dropdown options. In the dialog box, look for the "Page color" section, where you can choose your desired color from the palette or enter a custom color code. After making your selection, click "OK" to apply the change. Your document's background will now reflect the new color, enhancing its visual appeal.
Notion is an all-in-one workspace application that combines note-taking, task management, databases, and collaboration tools. It allows users to create customizable pages and organize information in a visually appealing way. To use Notion effectively, start by creating a workspace, then add various content types like to-do lists, calendars, and wikis. You can collaborate with others by sharing pages and assigning tasks. With its flexible templates and features, Notion adapts to personal or team needs, enhancing productivity and organization.

Atlassian Smart Links enhance the functionality of Trello by allowing users to seamlessly integrate and display content from various platforms within their boards. By creating rich previews of links, such as documents, videos, or project pages, Smart Links improve collaboration and streamline communication. To maximize their benefits, users should leverage Smart Links for relevant resources, ensuring that team members have quick access to essential information. This fosters a more organized workflow and promotes efficient project management within Trello.
To add fonts to Google Docs, start by opening a document and clicking on the font drop-down menu in the toolbar. Select "More fonts" to access the extensive font library. You can browse or search for specific fonts, and once you find one you like, simply click on it to add it to your available fonts list. After that, you can easily select it from the font menu for use in your document, allowing for greater customization and style.
Creating a table of contents in Google Docs is a straightforward process that enhances document navigation. Start by applying heading styles to the sections you want to include. Once you’ve formatted your headings, position your cursor where you want the table of contents to appear. From the menu, select Insert, then Table of contents, and choose your preferred format. The table will automatically generate and can be updated as you make changes to your headings, ensuring it remains accurate.
Transform Notion into a powerful CRM tool with a customizable template designed to streamline your customer relationship management. This approach allows you to track leads, manage contacts, and organize client interactions all in one place. By leveraging Notion's flexible database features, you can create a tailored system that fits your unique business needs. Enhance collaboration and productivity with integrated task management and project tracking, making it easier to nurture relationships and drive growth effectively.

Creating a welcoming experience for new members on Discord involves several key steps. Start by setting up a dedicated welcome channel that outlines community rules and expectations. Use bots to automate greetings and provide essential information. Encourage current members to personally welcome newcomers, fostering a friendly atmosphere. Consider organizing introductory events or activities to help new members engage with the community. Regularly update resources and maintain a positive environment to ensure everyone feels valued and included from the moment they join.
Automatically labeling emails in Gmail can streamline your inbox management by using filters to sort messages based on specific criteria like sender, subject, or keywords. This process helps keep your emails organized and easily accessible. Beyond automatic labeling, you can customize labels for categorization, color-code them for visual cues, and collaborate with others by sharing labels. Utilizing labels effectively enhances productivity, allowing you to focus on important messages while minimizing clutter in your inbox.
Microsoft To Do is an intuitive and versatile personal project management tool designed to help you stay organized and productive. With its user-friendly interface, you can easily create tasks, set deadlines, and prioritize your workload. The integration with other Microsoft applications enhances its functionality, allowing for seamless collaboration and synchronization across devices. Customizable lists and reminders ensure that you never miss important deadlines, while the ability to break down larger projects into manageable steps keeps your goals in clear focus.
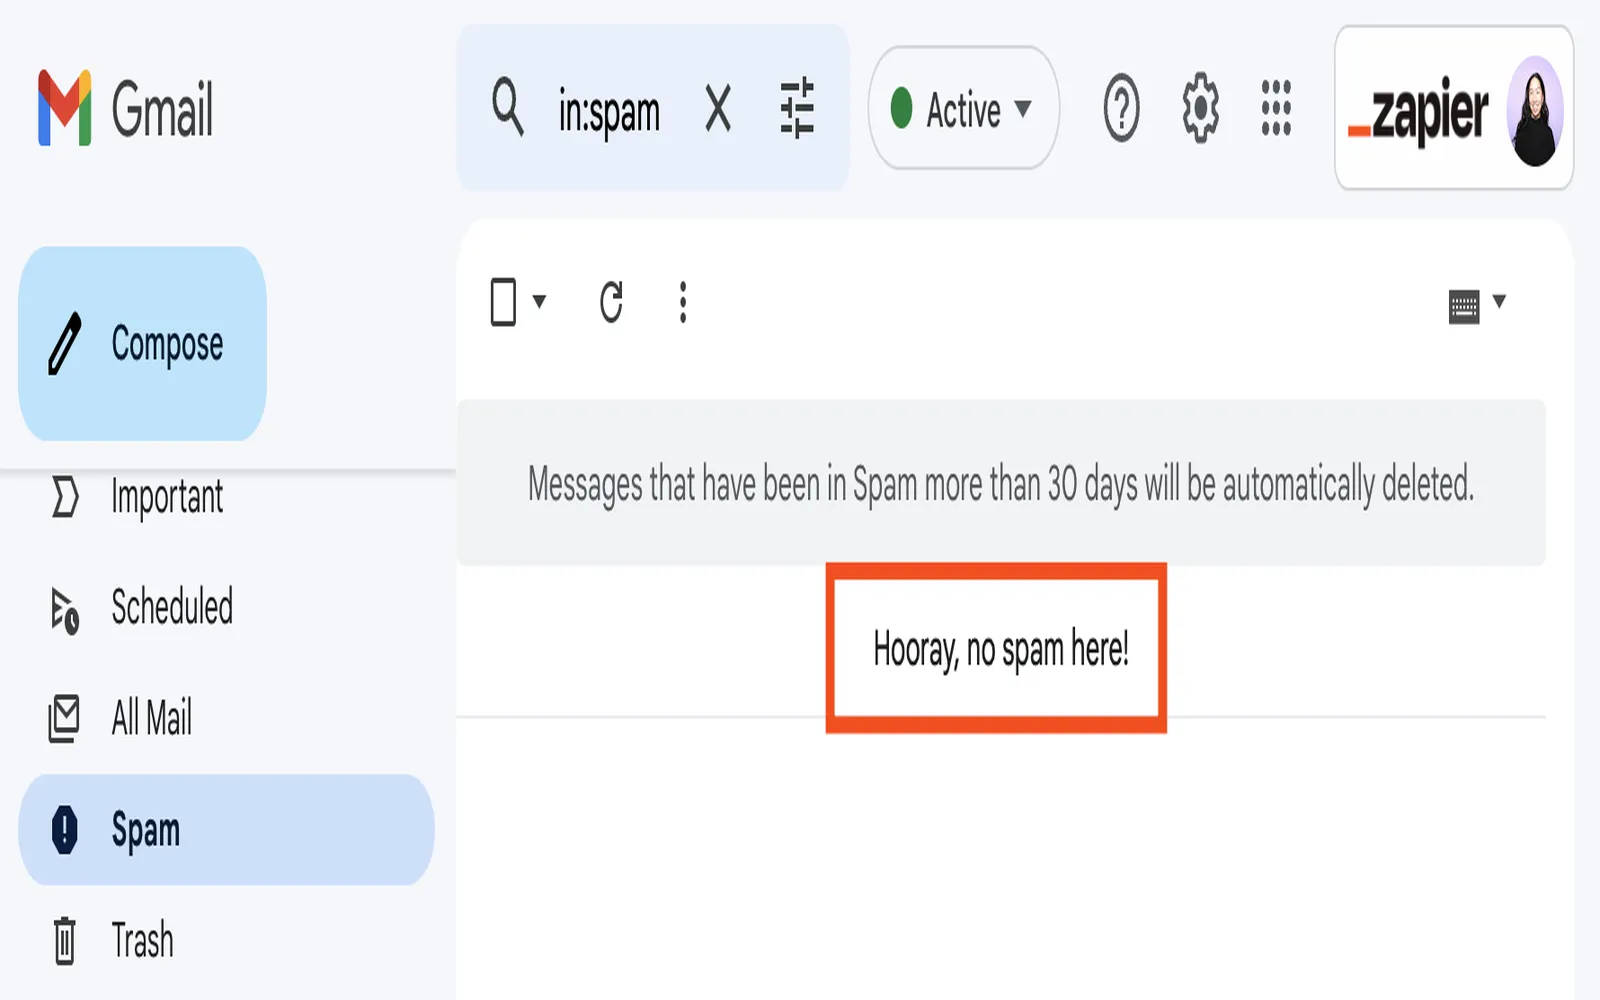
Organizing your Gmail inbox can significantly enhance your productivity. Utilizing filters allows you to automatically sort incoming emails based on specific criteria. Some effective filters include categorizing messages by sender, prioritizing emails with specific keywords, and automatically archiving newsletters. You can also create filters to label important emails or move them to designated folders, ensuring that your inbox remains clutter-free. By implementing these filters, you can streamline your email management and focus on what truly matters.
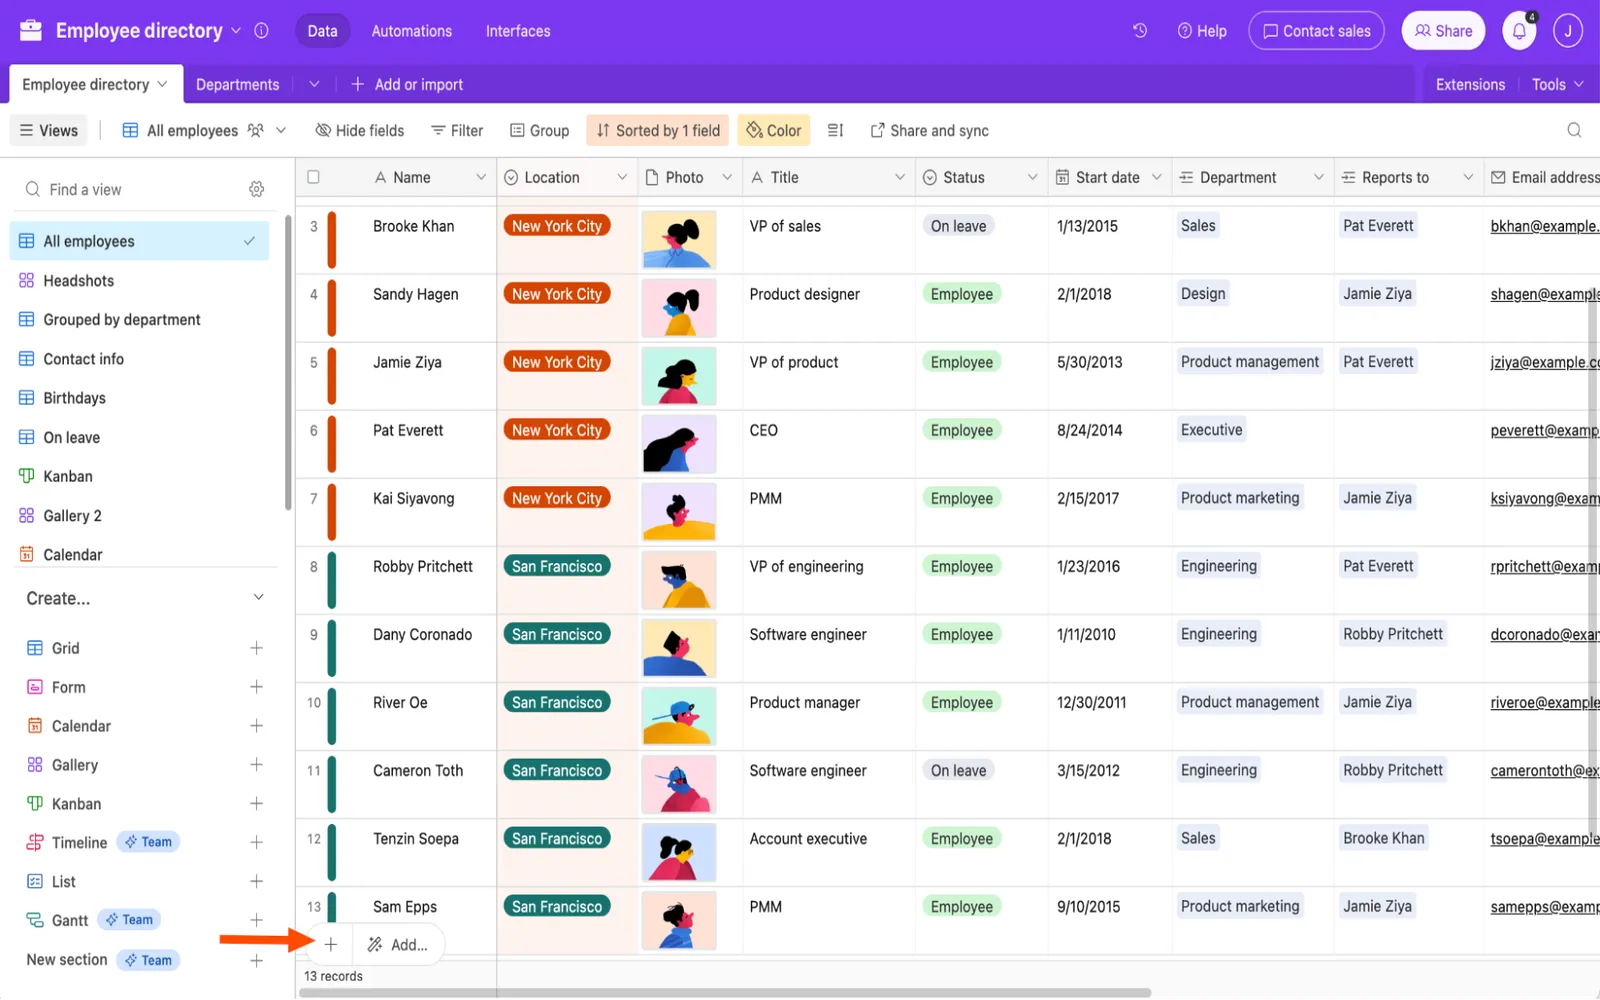
Airtable is a cloud-based collaboration platform that combines the simplicity of a spreadsheet with the power of a database. It allows users to organize, manage, and share information through customizable tables, forms, and views. With its user-friendly interface, Airtable enables teams to work together efficiently on projects, track tasks, and visualize data in various formats, such as grids, calendars, and kanban boards. Its versatility makes it suitable for a wide range of applications, from project management to content planning.
Monetizing a Discord server can be achieved through server subscriptions and server shops. By setting up subscription tiers, creators can offer exclusive content, perks, and community access to paying members, fostering a sense of belonging. Additionally, integrating a server shop allows for the sale of virtual goods, such as custom roles, emojis, or access to special events. These strategies not only generate revenue but also enhance user engagement, creating a vibrant community where members feel valued and invested.
To copy text from an image or video on Windows, you can use the built-in OCR feature in apps like OneNote or utilize third-party software. First, take a screenshot of the image or video, then paste it into OneNote, which can extract the text for you. Alternatively, online tools and dedicated OCR applications can also convert images to editable text. Once extracted, you can easily copy and paste the text wherever needed.
Creating a report in Salesforce involves navigating to the Reports tab and selecting the "New Report" option. Choose the report type that aligns with the data you want to analyze, then use the drag-and-drop interface to add fields, filters, and groupings. Customize the report layout to suit your needs, and use the preview feature to see how it will look. Once satisfied, save the report, give it a descriptive name, and share it with relevant users or teams for insights.
